
version 2.2. I did not realize that the current download availible is version
2.4. I have updated to the current version. Sorry for the confusion!
When I started selling on Etsy, I really struggled with getting the right
background for my images. I tried a few different things, but never really
liked it. Then I noticed a few sellers with great image pictures on a pure
white background. (Thanks, strumpfkunst!)I
wondered “how did they do that?!” When I looked closer, I realized that the
picture wasn’t taken that way, they took the background out AFTER the photo was
taken.
I’ve been using The Gimp for a while now to do some basic photo manipulation
with it. I also used it to create my banner and avatar. I used this great
tutorial to learn more about the features of The Gimp:
http://www.gimpguru.org/Tutorials/ . I’ve taken what I’ve learned, and
applied it to my item images. I thought that this information might be helpful
to others, which is why I decided to create my own tutorial.
If you don’t already have The Gimp – get it! You can download it for FREE here:
http://gimp.org/
HOW TO USE THE GIMP TO ERASE THE BACKGROUND FROM YOUR IMAGE
| 1. Open The Gimp | |
| 2. Click File --> Open | |
| 3. Select the picture you wish to edit. Click Open | |
| 4. Type Ctrl + L to bring up the Layers Dialog box |  |
| 5. Click the Duplicate Layer button |  |
| 6. In the Gimp Toolbox, select the Lasso tool |  |
| 7. HERE’S WHERE THE WORK STARTS: Using this tool, select your item. The closer you get, the less work you’ll have to do in the next step. What I’ve found works for me is to do a not so exact selection first, just to have a starting point. |  |
| 8. Then, zoom in. Hold down the SHIFT key to ADD to your selection. Hold down the CTRL key to REMOVE from your selection. This takes some time, but it is worth it! |  |
| 9. Now we are going to create a mask. Use the fill tool to fill in your selection with black. |   |
| 10. Make sure that "Fill whole Selection" is selected. |  |
| 11. Now type CTRL + I to invert your selection. | |
| 12. Change the color to white and fill in the selection |   |
| 13. Type CTRL + A to select all. Type CTRL + C to Copy (we’ll need this in a minute) | |
| 14. Bring up the Layers Dialog box (CTRL + L). Click the New Layer button to create a new layer. |  |
| 15. Change the layer name to “Mask” (optional) and select “White” for the background color. Right click on the layer that you just created. Select “Add Layer Mask”. Be sure that “White (Full Opacity)” is selected. |  |
| 16. Type CTRL + V to paste the selection into the mask |  |
| 17. Click on the “eye” next to the “background copy” layer to make it invisible – we no longer need it. (You could even delete it if you're so inclined) | |
| 18. Click on the anchor button to anchor the mask. |   |
| 19. NOW FOR MORE WORK – Zoom in close to your image. Using the brush tool, erase any remaining background. I like to use a brush that is large and fuzzy, and switch to a smaller brush for tight spaces. |   |
| 20. Use white to erase and black to add. | |
| 21. Use short strokes to make the most of the “undo” function. |  |
| 22. In order to make the edges more smooth – Click Filters --> Blur --> Gaussian Blur. The default settings work best for me, but you may want to play around with it a little to see what works for you. | |
| 23. TO ADD A SHADOW - Use the fuzzy select tool. Click anywhere on your item to select the mask. Then, in the Layer Dialog box, select the background layer. |  |
| 24. Click Filters --> Light And Shadow --> Drop Shadow. These are the settings that work best for me. Again, play around with it to see what you like. Be sure to uncheck the “Allow resizing” box. | 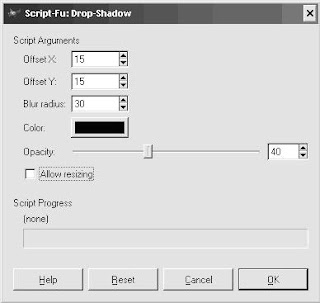 |
| That’s it! Be sure to save your image with an XCF extension so you can edit it later if you wish - filename.XCF. Then save as filename.JPG. |  |
OPTIONAL - If you don't want the background to be white, and you'd like to change it to something else:
- In the Layer's dialog box, right click on the "Mask" layer.
- Click on "Edit Layer Mask" to REMOVE the check mark.
- Use the fill tool and fill with whatever color you'd like!
Part TWO: How to make a transparent background using The Gimp


